Barre chords can present a huge barrier to the beginner guitarist. I often hear beginners blaming their anatomy (finger length, girth, etc.), but, truth be told, most guitarists have struggled with these grips at some point. Sure, some guitarists can pull these shapes off from the start, but chances are that their hand shape has or will cause some difficulties in other aspects of their playing. We are all just a little different anatomically, so don’t worry about it. Find ways to get around it and maybe even use it to your advantage. For those of you who find these shapes difficult – accept the challenge. It will take time for these shapes to become comfortable, but it will undoubtedly be worth it.
What is a Barre Chord?
Using a single finger to fret multiple strings is called barring. Barre chords use this barring mechanic to essentially achieve the same thing a capo does. Mastering barre chords is an extremely powerful tool, as it gives you the ability to voice open chord shapes across the entire fretboard. Many chords cannot be played open without having to retune the guitar or use a capo, so learning barre chords will give you a larger chord repertoire. You will certainly become a much better player after learning these. Before attempting to make any of the following barre chords, you should have a solid grasp with all the open chords. So saddle up, ditch that capo, and let’s get started!
The E Major Shape
To begin creating our first barre chord shape, start by holding an open E Major chord. Reposition the fingers to fit the second shape then move it up one fret. Next, lay the first finger flat across the first fret and press down. This creates an entirely new chord – F major.
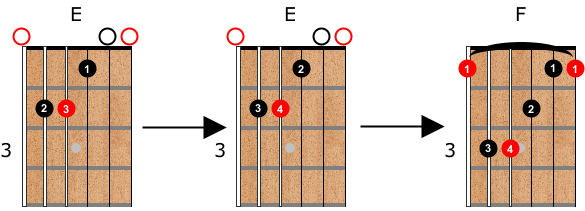
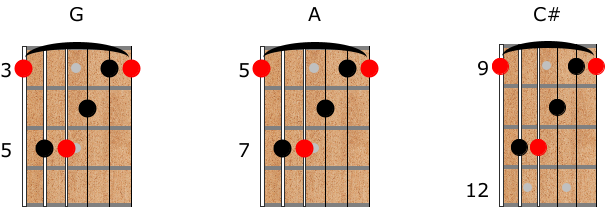
Notice the red notes within these shapes. Those are root notes, which serve as the foundation of the chord. For example, the root note to the E major chord is E. Since the root note lies beneath the index finger and is on the 6th string, you can easily create another chord with this same shape. All you have to do is have the notes along the 6th string memorized. To make another chord, find the note on the 6th string, barre that fret, and make the E major shape with the other fingers. Have a look at a few examples below.

Technique
It’s important to check each string to see if anything is muted or buzzing.
- Slightly roll the first finger to the side facing the thumb
- Try to keep your first finger straight with the fret wire
- Keep the thumb roughly behind the first finger on the back of the neck
- Keep the 2nd, 3rd, and 4th fingers curved and use the tip of the finger
- Move your fretting hand’s elbow in towards your body and use your forearm to help squeeze the strings
Also, be sure to avoid these things:
- Avoid any extreme wrist angles
- Avoid letting the first finger stick out above the fretboard.
Again, it is completely normal for these shapes to be difficult in the beginning. If your hand has trouble stretching this far, consider moving the shape further up the neck so that you don’t have to stretch as much. You’ll need to build up strength and dexterity in your fretting hand for these to become easier. The muscle between the thumb and the index finger will probably feel cramped if you play these for more than a few minutes at first. Take rest when needed and try to practice these for a short amount of time each day.
Practice moving these shapes with this chord progression:
Exercise #1

The E Minor Shape
Once comfortable with this shape, give the E minor shape a try. You may find this one a bit trickier since the 3rd string is added to the barre. It may be helpful to use the 2nd finger to add pressure against the first finger barre.
Once you’re comfortable with the E minor barre shape, add it to the previous chord progression.
Exercise #2

The E7 Shape
This E7 shape will create dominant chords along the 6th string. Check for any buzz or muted strings before moving on.
Exercise #3
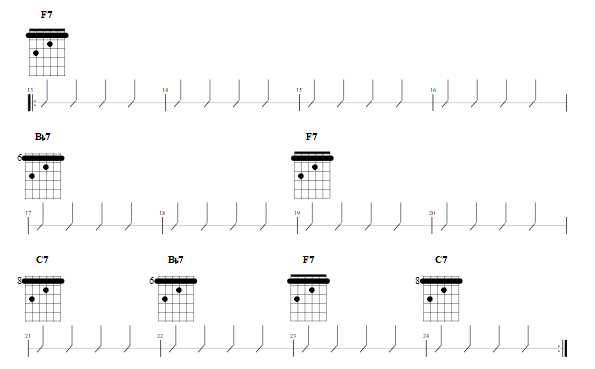
Check out this 12 bar blues with only this A7 shape
Exercise #4
This chord progression combines all the E shapes.

The A Major Shape
Once you’ve mastered the E shapes, try the A shape. First, begin by repositioning the open A major chord. You’ll want to either barre it with the 3rd finger or use the 2,3, and 4th finger to hold the chord. Barring with the 3rd finger is probably the most approachable way to hold this chord, because it’s much easier to switch to than the alternative.
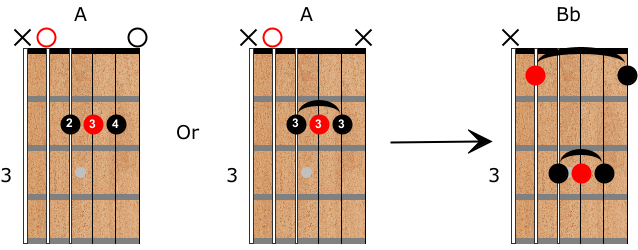
The root of this shape lies on the 5th string. Just like with the E shapes, you’ll have to memorize the notes of the 5th string in order to use these.

Notice that the 1st string is muted the barre 3rd finger example. Make sure you don’t accidentally barre the 3rd finger across the first string. Curl the third finger up at the joint closest to the nail and try to mute this first string. If you’re able to curl that finger to clear the first string and get the barred note to ring out, then that’s great. However, this is not obtainable for everybody. If it’s muted, then it’s good enough. If you want an easier method of getting the first string to ring out, use the 2nd, 3rd, and 4th fingers instead of barring.
Experiment with both fingerings and find which way works best for you. Remember to keep the 6th string muted with the index finger. Lightly touching the thickest string with the finger tip should mute it.
Exercise #5
Once the A shape is comfortable in your hands, slide it around a bit. Try this next example.

Exercise #6
Now it’s time to combine the E shape and A shape. Focus on accuracy instead of speed at first. Make the movements slowly and make sure the chord rings out clearly without buzz. Also, don’t keep the index finger on the 6th string while switching to the A shaped barre chord.

The A Minor Shape
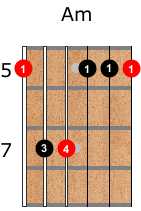
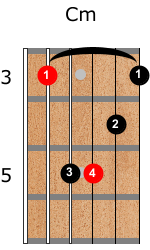
This next chord is more straightforward. It uses the same shape as the E major shape we already know. However, this shape actually creates a minor chord when the root is on the 5th string. This has to do with the tuning on the guitar (specifically the 2nd string). Try out this next chord progression with this chord.
The A7 Shape
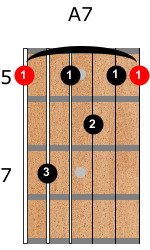
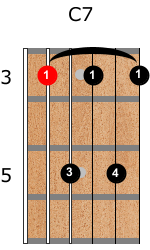
The last chord we’ll be looking at is this A7 shape. Once you’re ready, try a 12 bar blues chord progression using this and the E7 shape.
Exercise #7
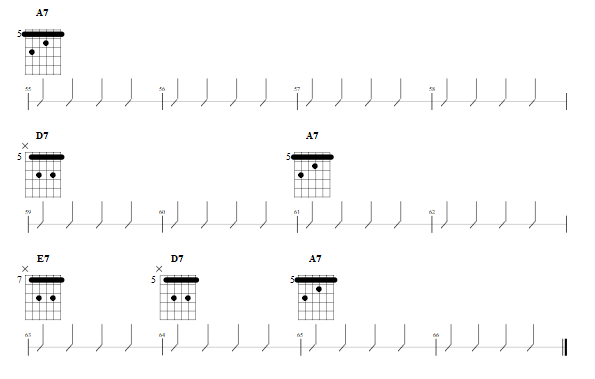
Exercise #8
This last example will combine the E, Em, A, and A7 shapes.

Practice Advice
So what are the next steps? I suggest adding each of these shapes into your practice routine. Try replacing the open chord songs you know with barre chords. Eventually these shapes will feel easy for you, so don’t give up!


Leave a Reply